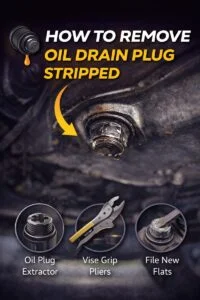
An oil change is supposed to be one of the simplest maintenance jobs a car owner can handle, which is why a stripped oil drain plug feels especially frustrating. Everything goes smoothly until the wrench slips, the bolt won’t turn, or worse, it spins endlessly without coming out.
At that moment, what should have been a routine task suddenly feels risky. Force it too hard, and the oil pan could be damaged. Leave it alone, and the oil change stays unfinished.
A stripped drain plug is a common problem, even on well-maintained vehicles. It usually happens because of over-tightening, worn threads, or using the wrong tool in the past. The good news is that most stripped drain plugs can be removed without replacing the oil pan, as long as the right approach is used.
This article walks through practical, proven ways to remove a stripped oil drain plug, explains why each method works, and helps you decide when a simple fix is enough and when professional help is the smarter move.
What It Means When An Oil Drain Plug Is Stripped
A stripped oil drain plug usually refers to one of two problems. In some cases, the bolt head is rounded off, meaning the wrench no longer grips it properly. In other situations, the threads on the plug or inside the oil pan are damaged, allowing the plug to spin without loosening.
Both problems feel similar when you try to remove the plug, but they require slightly different solutions. A rounded head resists turning altogether. Damaged threads allow the plug to turn, but it never backs out. Identifying which condition you’re dealing with helps prevent unnecessary damage.
Why Oil Drain Plugs Get Stripped In The First Place
Over-tightening is the most common cause. Oil drain plugs do not need extreme force. When tightened beyond specification, the threads deform over time. Repeated oil changes with excessive torque make the problem worse.
Using the wrong socket or wrench also contributes. A loose-fitting tool rounds the bolt head gradually until it can no longer be removed cleanly.
Cross-threading during installation is another cause. If the plug is not threaded straight, the threads inside the oil pan suffer damage that shows up during the next oil change.
Heat cycles play a role as well. Engines heat up and cool down repeatedly, which can cause metal expansion and contraction that weakens already stressed threads.
First Steps Before Trying Any Removal Method
Before applying force, clean the area around the drain plug. Dirt and oil buildup make it harder to grip the bolt and see what’s happening.
Use proper lighting and inspect the plug closely. Look for rounded edges on the bolt head or signs that the plug spins freely without moving outward.
Make sure the car is safely supported on jack stands or ramps. Removing a stuck drain plug often requires steady pressure, and stability matters.
Removing A Stripped Drain Plug With A Rounded Head
When the bolt head is rounded, the goal is to restore grip.
One of the simplest methods is switching to a slightly smaller socket or a six-point socket instead of a twelve-point. A tighter fit increases surface contact and may allow the plug to break free.
If a standard socket fails, a bolt extractor socket is often effective. These sockets are designed with internal grooves that bite into rounded metal as you turn them. Applying slow, steady pressure usually works better than sudden force.
Another approach involves lightly tapping the socket onto the bolt head with a hammer. This can seat the tool more firmly and help it grip worn edges.
In stubborn cases, locking pliers can be used if there is enough space around the plug. Clamping tightly and applying gradual turning force sometimes succeeds where sockets fail.
Removing A Drain Plug That Spins But Will Not Come Out
A spinning drain plug usually means the threads are damaged.
One effective technique is applying outward pressure while turning. Using a flat screwdriver or pry bar to gently pull the plug outward as you rotate it can help the remaining threads catch and back the plug out.
Another method involves threading a pick or small tool under the plug head to maintain outward tension. This approach requires patience and light pressure to avoid cracking the oil pan.
If the plug continues to spin freely, gripping the head with locking pliers and pulling while turning may provide enough resistance to remove it.
Heat And Impact Techniques
Applying heat around the oil pan area near the plug can help in some cases. Heat causes metal to expand slightly, which may loosen the grip on damaged threads. This should be done carefully to avoid burns or damage to surrounding components.
Light tapping on the bolt head with a hammer can also help break surface tension or corrosion. The key is controlled taps, not aggressive hammering.
Drilling As A Last Resort For Removal
Drilling should only be used when other methods fail. A small pilot hole drilled into the center of the drain plug can allow the use of a screw extractor.
This method requires steady hands and proper alignment. Drilling too deep risks damaging the oil pan threads or sending metal shavings into the pan.
Using grease on the drill bit can help capture metal shavings and reduce contamination risk.
What To Do After The Plug Is Removed
Once the stripped plug is out, the condition of the oil pan threads determines the next step.
If the threads inside the pan are still intact, replacing the drain plug with a new one may be enough. Always install the new plug by hand first to ensure proper threading.
If the threads are damaged, a thread repair solution is needed. Oversized drain plugs are a common fix and work by cutting new threads as they are installed.
Thread insert kits are another option. These restore original thread size and provide a durable repair when installed correctly.
In severe cases where the oil pan threads are completely ruined, oil pan replacement may be the only long-term solution.
Preventing Another Stripped Drain Plug
Prevention starts during installation. Always thread the plug in by hand for the first few turns. This helps prevent cross-threading.
Use a torque wrench if possible. Most drain plugs require surprisingly little torque. Following manufacturer specifications protects threads.
Replace worn or damaged drain plugs instead of reusing them repeatedly. Drain plugs are inexpensive compared to oil pan repairs.
Avoid using impact tools on drain plugs. Hand tools provide better control and reduce the risk of over-tightening.
Common Mistakes To Avoid
Using excessive force when the plug resists turning often makes the problem worse. If it does not move with reasonable effort, reassess the approach.
Ignoring signs of thread damage during previous oil changes leads to bigger problems later.
Over-tightening a replacement plug out of fear of leaks causes the same issue to repeat.
Cost Perspective Of Different Solutions
Replacing a drain plug is inexpensive and usually costs very little.
Oversized plugs and thread inserts cost more but are still far cheaper than replacing an oil pan.
Oil pan replacement is the most expensive outcome, especially if the pan is integrated into other components.
Why Taking Your Time Matters
Rushing a stripped drain plug removal often turns a manageable problem into an expensive one. Slow, controlled force preserves what remains of the threads and increases the chance of success.
Patience during removal also reduces the risk of personal injury from slipping tools or sudden movement.
Final Thoughts
A stripped oil drain plug is frustrating, but it does not automatically mean disaster. In many cases, careful tool selection, controlled pressure, and the right technique allow the plug to be removed without damaging the oil pan. The key is recognizing the type of stripping involved and choosing a method that works with the situation instead of against it.
Once the plug is out, addressing thread condition properly and installing the replacement correctly prevents repeat problems. With a thoughtful approach, what starts as a stressful oil change issue can end as a straightforward repair and a valuable lesson in careful maintenance.